First settings of your strip
The gist in 10 seconds
- Your strip is the first one on the left: the MY SEND frame sets what the others receive from you; the rest of the strip sets what you hear.
- Two settings before you play: the input (your instrument, in Audio settings) and the send GAIN, until “TOO HOT” never lights up.
- LIVE sends your instrument; ON AIR lets your voice through, only when you speak.
- Faders change nothing for the others: they make your headphone mix. Double-click resets to 0 dB.
The strip at a glance
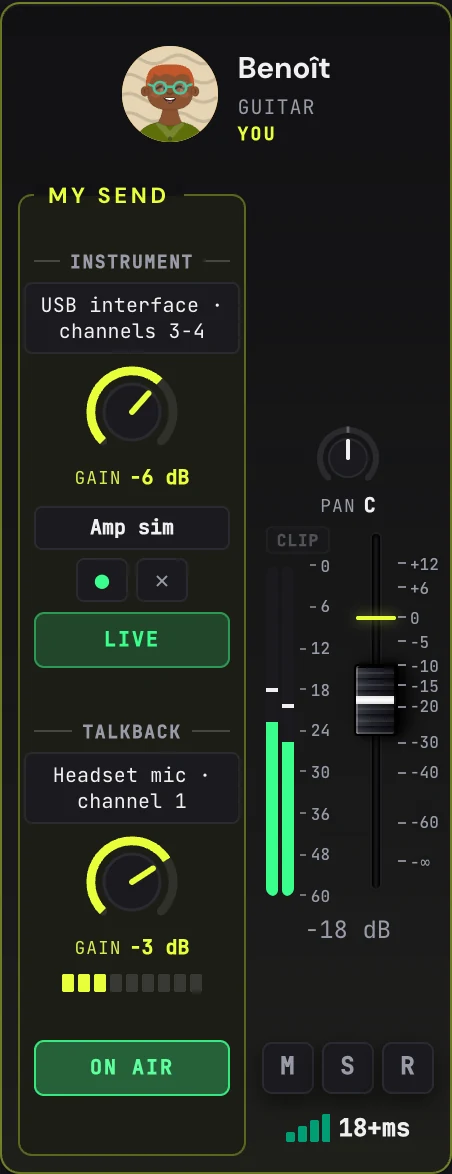
Your strip — MY SEND on the left, your monitoring on the right
- My sendWhat the other musicians receive from you: your instrument and your talkback, each with its source and gain. This frame only exists on your strip.
- Pan · faderYour monitoring, and only that. Turning the pan or moving the fader of a strip changes what you hear in your headphones, never what the others hear.
- Meter · CLIPThe level you receive from that strip, with the peak held for a moment. “CLIP” lights up when it clips; one click re-arms it.
- M · S · RMute (your monitoring), Solo (your monitoring), Arm for recording. M does not cut your send: for that, use LIVE and ON AIR, in the frame.
- LinkThe bars and the figure at the bottom: your latency bubble.
Steps
1
Pick your input
Click the block under INSTRUMENT (or open Audio settings): your interface and the channel your instrument is plugged into, e.g. “USB interface · channel 1”. If you sing into a mic on the interface, that is here too. → Configure your audio interface
2
Set the send GAIN
Play loud, as in rehearsal. The GAIN knob under the source sets the level at which the others receive you: raise it until your strip comes alive, without TOO HOT lighting up. If it does, the others receive you clipped: lower the GAIN, or your interface's gain. Double-click: back to 0 dB.
3
Check LIVE
The LIVE button under your instrument says it goes out to the others. Clicked, it switches to cut: your instrument no longer leaves, and your bubble shows “not sending”. Handy for tuning without being heard.
4
Put your talkback ON AIR
Under TALKBACK, the source is your mic (often a channel of the same interface, or the headset mic). ON AIR = the others hear you talk between songs; the noise filter only lets your voice through, not your instrument. PRIVATE = nobody hears you. The small segments under the gain show that your voice is getting through.
5
Make your headphone mix
Now the other strips: their fader and pan are your monitoring. Bring up the bass player, spread the guitars, turn down the metronome. Nobody else hears your mix. Your own strip's fader sets how much of yourself you hear (your monitoring); at the end of the console, MASTER and the OUTPUT block say where you are listening.
6
M, S, R when needed
M cuts a strip in your headphones, S keeps only that one, R arms it for the next recording (the “N armed” counter on MIX REC follows). All of it only acts at your end, except R, which prepares the take for everyone.
Why two separate settings?
Because your send and your monitoring do not serve the same purpose. If you turn a musician down because they play too loud, you lose them without changing anything for the band. The right move is to ask them to lower their send GAIN: Jamodio flags it to them with “TOO HOT”.
Because your send and your monitoring do not serve the same purpose. If you turn a musician down because they play too loud, you lose them without changing anything for the band. The right move is to ask them to lower their send GAIN: Jamodio flags it to them with “TOO HOT”.
If it does not work
- Your strip has no meter when you play: wrong input, or wrong channel. Open Audio settings, play a note and watch which channel moves.
- “TOO HOT” stays on: lower the send GAIN, then the interface's physical gain. An instrument that clips at the source clips everywhere.
- The others cannot hear you talk: ON AIR is on PRIVATE, or your talkback is disabled in Audio settings. If you already sing through the instrument strip, the talkback is unnecessary and Jamodio says so.
- You hear yourself twice: you listen to your instrument both through the interface (direct monitoring) and through Jamodio. Turn one of them off.
- A musician hears you too loud: it is not your fader (it only sets your headphones): lower your send GAIN.
Still stuck? Write to support@jamodio.com: we reply within 24 hours.
Checklist before the first note
- Input chosen: the right interface, the right channel
- Send GAIN set while playing loud, no “TOO HOT”
- LIVE on, ON AIR to talk
- Headphone mix done with the faders, your monitoring at a comfortable level
- R armed on the strips to record, if you record